Raku pottery uses special glazes and a particular firing technique which creates an oxygen reduction. This brings out the metallic colors of the glazes and you end up with pots that can look like gasoline spilled on blacktop - irridescent and metallic. I love the look, but there are some things to be aware of. This is a very unpredictable process. If your walls are not even, or sometimes just because, the pot can explode from the thermal shock. It is pretty much impossible to predict what your pot will look like after. Even the most dependable of glazes can behave erradically in the kiln, so if you're a control freak who needs to KNOW what your pot will look like when complete, this is not the process for you.
Also, raku is NOT food safe due to some of the more toxic elements in the glazes. We mostly dipped with some brushing to add the glazes, and we were outside in a very well ventilated area. Some people use airbrushes to spray the glaze on. If you do this, you MUST use a very good respirator CORRECTLY. (Someone in NC was seriously injured this year when she installed the filters incorrectly in her respirator - her lungs were seriously burned from inhaling the chemicals in her glazes and she almost died.) Unlike typical pottery, the reaction is not complete so it is necessary to seal your raku to keep the colors vibrant. I'll be using grout sealer, per my instructor's recommendation.
The first step, of course, is to have bisque. You must use clay capable of going to cone 6 and it must be a robust clay to stand up to the thermal shock. I shared a sleeve (25 pounds) of Highwater Raku clay with P. It's a bit more groggy (more sand) than I've gotten used to, so throwing it was interesting. This is the bisque that I had ready to go for the firing.

P picked me up, with coffee ready, and we were off around 8:00 am. The studio is at the instructor's home and is located about an hour away. Once we arrived, we greeted her German Shepherd, refridgerated everything for lunch (we'd decided on potluck, so everyone brought something) and headed to the studio.
As with any firing, the first step is preparing the bisque. She had compressed air to clean the pots or you can wipe them down with water to remove any dust. Then wax the bottoms to keep the glaze off - I dribbled a bit on one pot and once the wax is on there, you can't get it off without refiring so I used a brush to splat wax here and there on the pot. (Sometimes I think that I haven't necessarily gotten better at the pottery, I've just gotten better at making my mistakes look intentional.)
Second step: glazing. Chose your glazes so the colors and textures compliment your pot. Or, if you have no idea what the colors will look like, slop them all over the place and have fun!


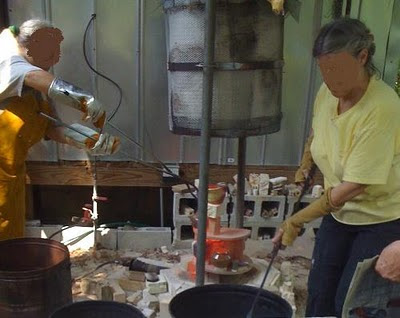
Step three: loading the kiln. This is the first step that is a bit different for raku. As you must pull the pots quickly from the kiln, you load them with an eye to getting them back out. (For an electric kiln, the pots stay put until cool so you can pack 'em in there pretty much any which way.) The kilns we used for this were lowered down over the stack of bisque, so planning became even more important - you don't want to not have room for the kiln to be lowered. Once everything is stacked and ready, the kiln was lowered into place and lit. (These were both gas fired kilns.) Then we waited forever.


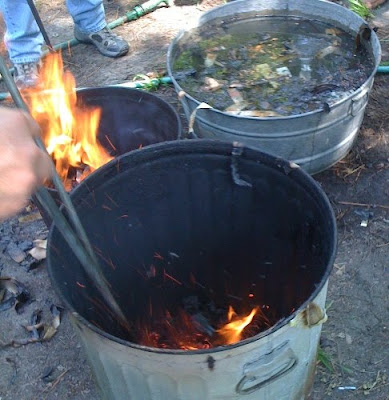
While we waited, we shredded massive amounts of newspaper into a large trash can. We also made "gaskets" by completely submerging 8 - 10 open sheets of newpaper in water. These we set to one side for later. We also got the metal garbage cans ready for the next steps. We emptied any ash out, covered the bottom of each garbage can with sawdust and a handful or two of the shredded paper, and made sure we knew where the lids were.

Step four: pulling pots. When the glazed pots were ready, we pulled on heavy fire gloves and grabbed long handled tongs. The kiln was raised. (The main kiln was rigged with a concrete block counterbalance, which made it MUCH easier than the secondary kiln. That one required us to put a rod through the handle on the top, and two people raised the kiln up and over. Both the guys lost most of the hair on their legs, and I was fairly convinced that my pants were going to catch on fire.) The pots were glowing red hot, and the heat was incredible. We reached in with the tongs, grabbed a pot, and put it in a metal garbage can. The paper people then threw several handfulls of shredded newspaper into the can, then another pot, then more paper until the can was about 3/4 full. Then the wet paper gasket was placed over the can and the lid fitted over that.


Step five: burping the pots. After everything sat for half an hour or so, we lifted the lid and introduced more oxygen into the garbage cans. Once the fire flared up, we added more newspaper if needed and shut the lid again.


Step six: into the water. Everything sat for another hour or so. (And we took the opportunity to go off and have lunch - YUMMY. P made an amazing apricot cheesecake, I made marinated cheese and a fruit salad, there were sandwiches, pasta, veggies and dip, more fruit - everything was REALLY good!) After we ate, and dragged ourselves back to the kilns, we used the tongs again to root around in the trashcans and find all of the pots. We put them into the water to quench them and they stayed there until they were cool enough to handle.


Step seven: out of the water. Once the pots had cooled, we fished them out of the water and rinsed them off. Some of the colors look even better if you scrub them with Ajax and a scotch bright.
Step eight: sealing. At some point, I will take my pots and seal them with grout and tile sealer. This keeps the colors from fading.
A separate part of the program was to be smoke painting. To do this, you put unglazed bisque in the kiln, heat it 'til it's glowing red, pull it out and immediately use feathers and horse hair to add designs to your piece. Once it's like you want it, let it cool and then polish it with several coats of wax. I tried this several times and failed miserably. I had one piece close, but I didn't realize that if you refired it to heat it up, you lost all previous attempts. Darn it! So, I ended up glazing everything 'cause smoke painting is currently beyond me. Part of the problem was that you have to work REALLY fast, and with 8 of us milling around, the pot was cooled off before I even really got to it. I'll need to play further with this.
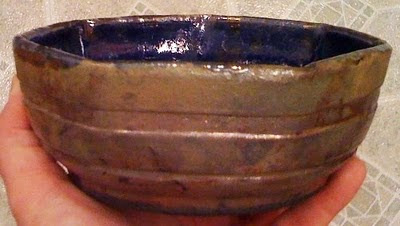
And here are all of the after pictures. All in all, I've happy with how they turned out and with the whole experience. I definitely want to do it again one day!


1 comment:
OMG!!! (I know, I'm late, but I am reading EVERY post since March...)
I can see why you are so taken by the Raku! Those colors are amazing!
OK, I'm going back to reading some more!!! :) Thim
Post a Comment